
$20 DIY Inspiration Board (AKA: How I turned a funeral home display board into my office inspiration board)
I've been on a roll when it comes to decorating my office / library lately. And for good cause: I spend a lot of time in here. On the weekends, G and I find ourselves in the kitchen and living room a lot. But on the weekdays, I come home from work, eat a quick bite, and often end up blogging or novel writing at my desk before retiring to the bedroom. So I need this office to be pretty. Stat.
In recent posts, I've shared how I...
- Painted the dated, buttery yellow walls PPG's Pollination Green
- Furnished the space and started lightly decorating my desk
- Added a lovely, black, cage-style pendant light above the desk
- Started a gallery wall of vintage magazine covers above my books
Then, I brainstormed about the type of inspiration board I wanted over my desk. Because a writer / blogger / do-it-herself should always be maximally inspired.
I like big boards and I cannot lie.
I decided I wanted a BIG bulletin board... but not one that takes up the entire wall. I scoped out your basic framed cork boards at Target, WalMart, and even Menards. My results were either underwhelming or overpriced. I'm just not willing to pay $50 for a cork board. It's cork and a cheap wooden frame, for goodness' sake.
So finally, I went back to Goodwill. I decided I could buy a few small bulletin boards for cheap and paint them - hanging a sort of gallery-style arrangement of bulletin boards. I was just about to tote three cheapo, used boards to the front counter when something else caught my eye.
Goodwill score!
It was a decent-sized display board covered in navy blue felt and made of heavy-duty cardboard. The back had a little sticker saying something about being property of a funeral home. It was one of those display boards that they use at funeral homes to show photos, notices, etc. But most funeral homes these days show those things digitally on television screens, so it's no small wonder that the thing ended up at Goodwill. I have no problem with it being from a funeral home. And for just $10, I nabbed it right away and put the bulletin boards back.
There's a project a'brewing...
Now, I knew the navy blue felt wouldn't work in my space. The office sticks to a pretty strict scheme of chartreuse, dark charcoal, medium gray, emerald, and shades of turquoise. So I'd need to recover the board with fabric. Unfortunately, the crafts stores were a thirty-minute drive to the other side of town. I hit up Target instead, since I remembered a large amount of curtains that had been marked clearance. I found a simple gray curtain for a mere $7. Then I bought some staple-like tacks for about $3.
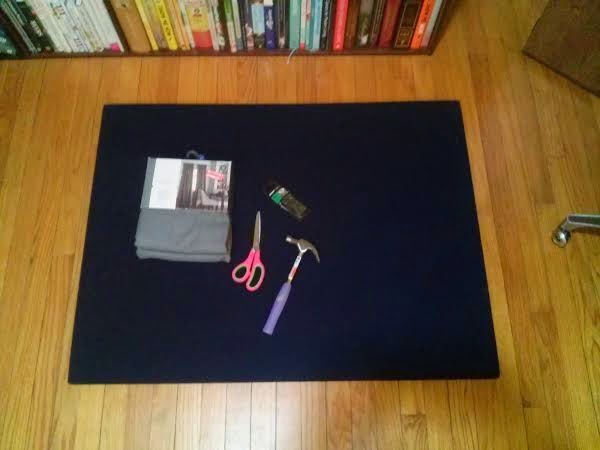
How I transformed ^this:
Here's how I turned those three items into my own inspiration board:
- I put the board on top of the curtain and trimmed the curtain down with about a 2-3 inch margin all around.
- I flipped the board over face-down on the curtain, pulled one of the 2-3 inch margins of fabric over to the back and tacked the fabric in using a hammer.
- I did the opposite side, making sure the pull the fabric as tight as possible without pulling out the tacks (since this is only cardboard and the tacks could be pulled out).
- I folded the corners under kind of like wrapping a present, then tacked those in.
- I tacked in the top and bottom margins, again pulling as tight as possible.
I really should have taken step-by-step pictures, but it was just me. I only have two hands and every step demanded both of them.
Hung up on hanging up.
I had a bit of trouble hanging this one the wall as there was no hook on the back or anything. Plus, the board was slightly warped. So I ended up just nailing the thing to the wall. Yeah, there are some nail heads that show, but they blend in with the gray color. I like knowing that it's securely fastened to the wall. And besides, the nail heads will soon be covered up by scraps of inspiration.
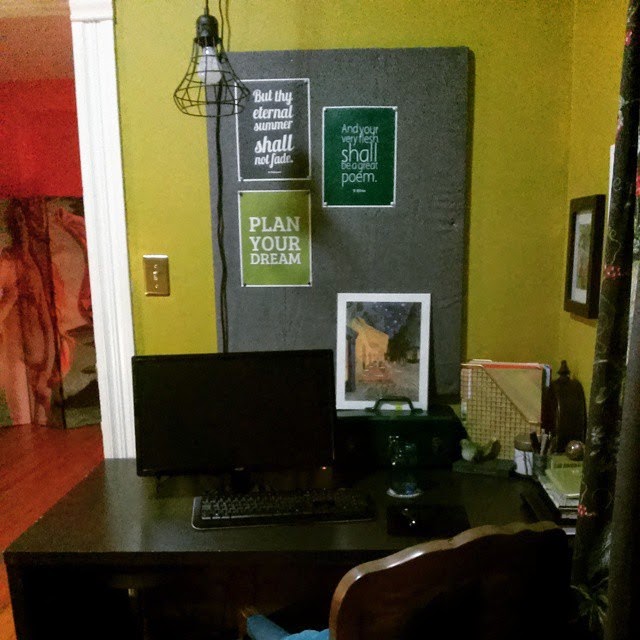
The big reveal...
.jpg)
I wouldn't mind if it were slightly larger, but I'm quite happy with how it turned out. And if I ever tire of the solid gray, I can pull out the tacks and recover it with something else.
I would have spent $50 on a board, plus more for paint to cover up the color of cork, which I loathe so much. So for $20 and an hour on this baby, I'm very pleased. :)
Time to get some inspiration up in here.

Comments